
Today’s guest article was written by Tom Puketza, and he has some practical rules for time-strapped GMs looking to create their own tabletop terrain — as well as a fantastic finished piece — to share. Thanks, Tom!
Like any gamer, I like tiles, scenery, and terrain. Like any responsible adult, I have a built in conflict with the expense and time it takes to purchase or make the stuff.
Still, I caught the terrain bug somewhere. I hold this man responsible.
Nonetheless, as good as he is, I still have issues. Time is still a factor. Even though they are fast, I have enough time to make game plots, or make tiles. Rarely do I have both. Space and storage is also an issue. And transport. So even under the best circumstances, this stuff can still be a hassle.
And yet, I still want to make stuff for use in my game.
So I’ve adopted some rules for the scenery I make:
1) It must be multi-functional.
2) It must feature heavily in more than one session.
3) It must be adaptable enough to be featured in more than one adventure.
Now, some disclosure: I’ve only made a couple of dungeon set pieces so far. The first one was a row boat. I cut the shape out of an old laptop box, mounted some brown paper from a grocery bag, and hand drew the details of the boat using markers and colored pencils (because I don’t have paints). The results are primitive, but the players really liked it anyway. I was actually surprised.
After this modest success, I made the logical decision to make my second attempt a multi-level wizard’s tower. It’s a long story, but my players were mounting a stealth mission to sneak into said tower, which is part of a city’s college of war mages. It was a good self contained place to showcase. That, and I had a perfectly sized circular cardboard tray from a frozen pizza. So that pretty much settled it.
Instead of crafting ten individual tower levels, I created a “tower kit.” I found a good floor tile pattern here, and then cut out another cardboard ring to give the tower its outer walls. The floor pattern I used is actually a colored set printed in black and white. I mounted this to the pizza round using rubber cement, then I mounted the outer ring using gorilla glue. I actually don’t suggest gorilla glue for this kind of project. It expands as it dries and it gets messy. But it also bonds everything to everything, and it was also the only super ultimate mega glue I had handy. So that’s what I used. As it dried and expanded I did my best to wipe it away using a toothpick. Lastly, I colored the outer ring. I attempted to give it a grey pattern and approximate stone, but the effect did not look good against the cardboard. Mounting a brick pattern wouldn’t work for this either. So in the end, I just took a black sharpie and colored my outer walls black.

Rather than including fixed walls and stairs for the interior, I decided to make these elements into their own separate tile pieces. That way, I could move them around and create different floor plans representing each different level. Included with the floor tile download is also a good brick pattern. So I printed that, mounted it, and measured out sections a half inch wide each. I then cut a number of these out in various lengths. These sections became my walls. For stairs, I couldn’t find a good central stairwell that would print in the size I needed, so I drew one and mounted that as its own mini-tile. It came out good enough.
I had downloaded furniture to print and mount (courtesy of the cartographers guild), but I was unfortunately running out of time. I also wasn’t crazy about those pieces either. I did have, leftover from a different crafting project, some craft sticks, which can be found at any pharmacy store near the crayons and art supplies. These actually were not the easiest to shape (or maybe it was the fact that I cut them all with scissors), but I was able to create different pieces of various length. These became my stand ins for doors, windows, furniture, and whatever else. It should be noted that these are easy enough to draw on using magic markers. I chose not to do this, however, for two reasons. One, I’m not that great at drawing things. Two, left blank, these little bits of wood could stand in for anything, meaning I wouldn’t have to fish around for specific pieces and waste time. In the end, I did end up using a couple of specific “special” set tiles, like statues and magic circles. But this also had the side effect of highlighting these objects as noteworthy.
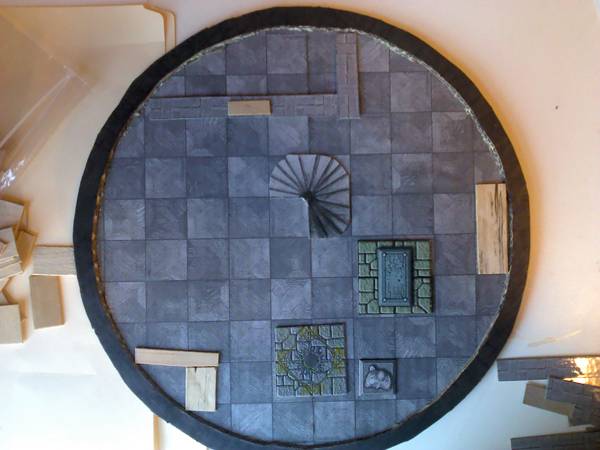
The end result, while admittedly simplistic, and certainly not perfect, still brought some nice “production value” to the game. I can also easily re-purpose this piece should I need a big round room sometime in the future.
Not bad for a pizza tray, a cereal box, two photocopies, some glue and some popsicle sticks. Also keep in mind that I have, maybe, one skill point in “art”.
Now to determine the practicality of crafting Ork tents out of old Chinese lo mein containers. Or maybe that cardboard thing that held my Annie’s Pizza Bites…


With another floor and some cheap dowels, you could easily make this puppy 3-D. I’m not sure how you’d handle the stairs, but other than that it seems like it would work well.
Fantastic article, Tom — thanks for sharing it!
This is pretty cool, and it looks a lot faster than making plaster. Thanks for the tips.
Nicely done, Tom.
Another resource for print out tiles could be some of the tiles of the Dark World or Hero Quest games.
I personally have both games at home and I tend to use resources for both when running encounters.
I think this sort of ‘kit’ would be useful for a lot a different applications. Thanks for the ideas!
I like it! I’ve always been a fan of such things, though I rarely use them myself. It occurs to me that if you had a spare 15 minutes, you could knock up one bit. Do another later in the day, every day, and by the end of the week you have a small dungeon!
I like it! I’ve always been a fan of such things, though I rarely use them myself. It occurs to me that if you had a spare 15 minutes, you could knock up one bit. Do another later in the day, every day, and by the end of the week you could have enough for a small dungeon.