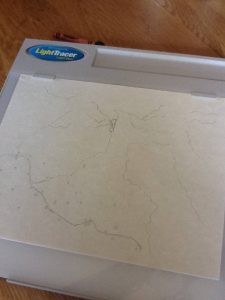
In the first part of this series I explained the various sources that served to inspire me to create a map of the lands north of Steffenhold – the fantasy setting for my homebrew campaign. After grabbing my base hex map and selecting the paper I would use for the map, I was ready to begin tracing in pencil.
Step 3: Rivers, lakes and roads, oh my
With pencil, I began to lightly trace those elements I believe are “hard-wired” into a fantasy map, namely waterways, roads, towns and ruins locations. My decision to apply lines lightly will serve me well later on.
Step 4: Drawing in mountains
You might be tempted, at first, to simply draw in a mountain for every hex containing an arrowhead symbol. But we don’t just want a symbolic representation of mountains, we want an artful one.
That means I’ll be drawing mountains on the parchment over the areas indicated on the hex map, but trying to avoid a one-on-one relationship between the hex map and the new one.
I mean, the most iconic map in all of fantasy literature is the one of Middle Earth that appears in J.R.R. Tolkien’s The Lord of the Rings. Perhaps the most prominent features are the elevated peaks of the Misty Mountains and the bunches of trees signifying the Mirkwood. I’ll be striving for much the same, making the forests and the mountains the most prominent features.
My technique for drawing mountains is not to draw individual peaks, per se, but to draw in a line representing the skyline, or capline of the peaks, then roughing in some texture, such as lower peaks or depressions and outcroppings in pencil. Sometimes, this amounts to filling in with some squiggly lines. To be consistent, however, my shadings I kept to one side or the other, depending on the range.
As I progressed down the page, I would draw another capline the width of the range as indicated by the hex map beneath, then fill in the same until I had reached the southern extent of the range.
When I was done I stepped back and examined it to be sure that I had the effect I wanted. In a couple of places I used my kneaded eraser then redrew the range to my satisfaction.
Step 5: Landforms
I suppose this is what a true cartographer would refer to as topography, adding the other landforms that give the landscape it’s three-dimensional feel.
Specifically it means adding in hills, lots and lots of hills. Drawing mountains were easy in comparison.
For variety’s sake there are round hills, small peaks, gradually sloped hills, even a few mesas and plateaus.
On the right side, I knew that the Monsey River flowed out of the Russett Mountains through an unnamed ravine. Now, I used to draw ravines while doodling in class, the sort of cliff overhangs that Wile E. Coyote usually would tumble into after missing his mark with the Road Runner.
But that kind of ravine didn’t really fit this map. So I settled for what you see here, a series of bumps, really, that rise up on both sides of the stream. Maybe it wasn’t the best way to represent a ravine, but hey, it was my first time.
Now I was about ready to enter the part of creation where there is no turning back–inking the map. And that, we’ll save for the next installment.








That’s actually quite good, Troy.
And I adore the ol’ “Page 3 & 4 of a fantasy novel” style of cartography as opposed to a more modern and realistic take. Satellite shots from space of my fantasy world boot me out of immersion.
Your mountains are ever so much better than mine, hehe. I admit to doing the “lazy” thing and just using cone shapes for mountains at times.
Glad to be following this series 😀
I feel like a strung out junkie, and you’re my dealer, barely giving out my crack.
How long you gonna drag this out? This 10 part series is killing me!
😉
Seriously, though… loving this.